 English
/
  Japanese
 English
/
  Japanese
EOS does not have 801.1X authentication feature. We have developed the software provides it on EOS as extension package to help easy installation for switch engineers.
This documents shows about the installation and setup process of 802.1X suite for EOS we have developed.
Notice: Mar. 2011, this software is beta. Use at your own risk, please.
Kenta Mukai, Yutaka Yasuda
Arista Square
19/Dec/2012 : added the 5. Rebuild / Update from sources section. You can build one for your own EOS verision.
30/Mar/2011 : first beta release. For EOS 4.5.1.
1. Outline
1.1 Running Environment
1.2 Features
1.3 Software Structure
1.4 Packages
2. Installation
2.1 Package Installation
3. Operation
3.1 Configuration
3.2 Start Processes
3.3 Stop Processes
3.4 Log Management
3.5 Troubleshooting
4. Uninstallation
5. Rebuild / Update from sources
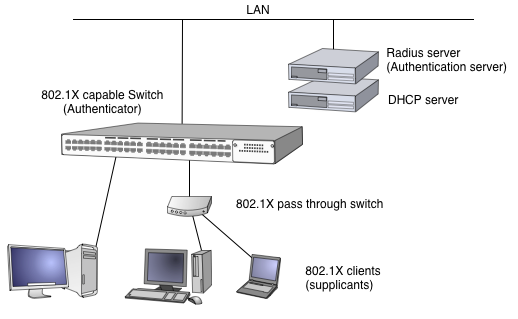
As figure 1. shows, 802.1X is structured by three elements. Authenticator, Authentication Server and Supplicants.

Figure 1. Generic 802.1X configuration
Typical authentication process will be doing;
Usually, Authenticator builds on the switch. It means the port which connected to Supplicant is isolated initially and it will be opened when the authentication will success.
802.1X standard had been designed as port based access control. But some user might not be able to use single port for single PC. So then, leading by market, people extend 802.1X standard and there are MAC address based port sharing capable products.
802.1X uses EAP protocol and on the wired LAN (Ethernet), it uses EAPOL (EAP over LAN) protocol. EAPOL uses the special MAC address 01:80:C2:00:00:03 as the destination. It is a part of Bridge control address which is standardized by IEEE 802.1D. Spanning Tree is also uses it. Therefore, non 802.1X switches will throw it away in the box, will not forward to any port.
As the result of it, the authentication request from Supplicant will not reach to upper 802.1X switch. To solve it, there are "802.1X pass through" switches in market and it forward EAPOL packets to upstream, or specified port). When you set the port sharing configuration, you need to use it to connect Authenticator to Supplicant.
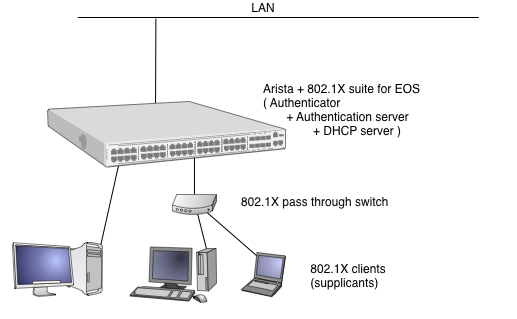
802.1X suite for EOS makes an environment as shown in figure 2.

Figure 2. 802.1X suite for EOS configuration
It is one box solution and it maximize the software execution performance of Arista. In concrete, Authenticator, Authentication server and DHCP server runs on Arista box. We can provide log integration feature (showing below) as the result of all in one approach. Of course you can use external DHCP or Radius server if you want, with few configuration works by your hand.
Here are the list of features 802.1X suite for EOS provides.
Figure 3. shows the software structure that included in 802.1X suite for EOS.

Figure 3. Software structure that included in 802.1X suite for EOS
We shows detail information such as version in the next section. In here, we shows the role of each component.
802.1X suite for EOS provides as SWIX and RPM packages to help installation process easy. Here are the list of information of each package.
Above RPM files had been built for EOS 4.5.1. For more recent EOS, you can build to update the software by yourself. See 5. Rebuild / Update from sources.
Download following files and put into USB memory drive. File name is changeable as you like but need to keep the suffix.
Above RPM files had been built for EOS 4.5.1. For more recent EOS, you can build to update the software by yourself. See 5. Rebuild / Update from sources.
Follow CLI commands below to register them as Extensions. Put USB memory drive on your Arista box and execute COPY command as follows;
localhost#copy usb1:hostapd-0.7.3-EOS451.i686.rpm extension:
localhost#
Repeat this process for the rest of files.
You can check the status of the registration of Extensions as SHOW EXTENSIONS command.
See the Status is "A, NI".
localhost#show extensions
Name                                       Version/Release           Status RPMs
------------------------------------------ ------------------------- ------ ----
dhcp-4.1.1-18.P1.EOS451.i686.rpm           4.1.1/18.P1.EOS451        A, NI  1
freeradius.EOS451.swix                     2.1.9/EOS451              A, NI  2
hostapd-0.7.3-EOS451.i686.rpm              0.7.3/EOS451              A, NI  1
perl.EOS451.swix                           5.10.0/82.fc12            A, NI  6
A: available | NA: not available | I: installed | NI: not installed | F: forced
localhost#
Next boot time, these extensions will be registered automatically. For more detail information, see Extensions of Arista Square.
Install by EXTENSION command of CLI. Keep the order of installation for their dependencies.
localhost#extension hostapd-0.7.3-EOS451.i686.rpm
localhost#extension perl.EOS451.swix
localhost#extension freeradius.EOS451.swix
localhost#extension dhcp-4.1.1-18.P1.EOS451.i686.rpm
localhost#
You can check the status of the registration of Extensions as SHOW EXTENSIONS command. See the Status is "A, I".
localhost#show extensions
Name                                       Version/Release           Status RPMs
------------------------------------------ ------------------------- ------ ----
dhcp-4.1.1-18.P1.EOS451.i686.rpm           4.1.1/18.P1.EOS451        A, I   1
freeradius.EOS451.swix                     2.1.9/EOS451              A, I   2
hostapd-0.7.3-EOS451.i686.rpm              0.7.3/EOS451              A, I   1
perl.EOS451.swix                           5.10.0/82.fc12            A, I   6
A: available | NA: not available | I: installed | NI: not installed | F: forced
localhost#
We skip to show the configuration process of FreeRADIUS and dhcpd.
See the original document of them.
But the location of the configuration file had been moved to following paths.
dhcpd: /persist/local/dhcp/
FreeRADIUS:/persist/local/raddb/
Configuration file is /persist/local/etc/hostapd/settings.txt. See the following typical configurations and detail explanations are followings.
bash-4.0# pwd
/persist/local/etc/hostapd
bash-4.0# cat settings.txt
interfaces=et19

logger_syslog=2
logger_syslog_level=2

eap_reauth_period=3600

own_ip_addr=127.0.0.1

auth_server_addr=127.0.0.1
auth_server_port=1812
auth_server_shared_secret=xxxxxxx

acct_server_addr=127.0.0.1
acct_server_port=1813
acct_server_shared_secret=xxxxxxx

bash-4.0#
This configuration file will be broken down to /persist/local/etc/hostapd/conf directry when you start hostapd program. You do not change the configuration files under conf directory by manually.
Start FreeRADIUS and dhcpd daemon. At present, we do not set the automatic start and there is no CLI command to do that. So you need to do it from bash shell of EOS. You need to do the same process after you boot the Arista. (we may add automatic starting feature soon. Need beta testers!)
bash-
4.0# /etc/init.d/dhcpd start
Starting dhcpd:
bash-
4.0#

bash-
4.0# /etc/init.d/radiusd start
Starting RADIUS server:
bash-
4.0#
Start hostapd and enable 802.1X service. There is CLI based commands for that but you need to move to configuration mode of EOS CLI first. And use DOT1X SYSTEM-AUTH-CONTROL command as follows. (we may add automatic starting feature soon. Need beta testers!)
localhost#configure
localhost(config)#

localhost(config)#dot1x system-auth-control
Applying Mac Access-List: [  OK  ]
Starting hostapd_acl_worker
Starting hostapd: [  OK  ]

localhost(config)#
There is no special terminate process for FreeRADIUS and dhcpd. Just use the init script to stop them same as start them.
Stop hostapd and disable 802.1X service. As same as starting, move to configuration mode of EOS CLI then do NO DOT1X SYSTEM-AUTH-CONTROL command.
localhost(config)#no dot1x system-auth-control
Stopping hostapd: [  OK  ]
Removing Mac Access-List: [  OK  ]

localhost(config)#
As result of this action, remove all MAC ACL conditions from all 802.1X service assigned ports. Attention all hosts connected to these ports can access to the other ports without any authentication.
Integrated Log display script shows integrates informations of log files of hostapd and dhcpd. It shows username, MAC address, IP address and authentication status at specific time. The script is /persist/local/etc/hostapd/show_integrated_log.py and written in Python. Just execute as follows then you can see the integrated log lines.
bash-4.0# cd /persist/local/etc/hostapd
bash-4.0# python show_integrated_log.py
 :
dot1x: Mar 31 03:42:24 et18 john 00:09:6b:3f:ce:fe authenticated
dot1x: Mar 31 03:42:54 et18 john 00:09:6b:3f:ce:fe 192.168.12.178
dot1x: Mar 31 03:44:44 et17 foo 00:1f:d0:ad:c7:e7 authenticated
dot1x: Mar 31 03:45:04 et17 foo 00:1f:d0:ad:c7:e7 192.168.12.162
dot1x: Mar 31 03:47:49 et17 foo 00:1f:d0:ad:c7:e7 unauthenticated
dot1x: Mar 31 03:48:26 et18 john 00:09:6b:3f:ce:fe unauthenticated
bash-4.0#
Each line corresponds to the single event. Here is the list of the event types and the log line format.
Here are some known problems and solutions.
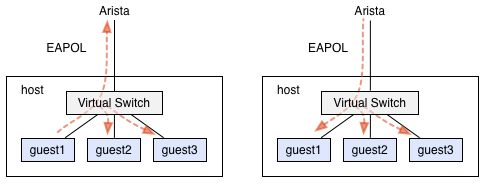
We confirmed the problem under the virtual host system such as KVM. The supplicant software such as wpa_supplicant does not work correctly on the guest OS. The reason is the virtual switch, it forwards switch control packet including EAPOL to all other ports. See figure 4.

Figure 4. EAPOL forwarding on virtual switch
Some supplicant software including wpa_supplicant might not work correctly when it receives EAPOL for or from the other host. Easy workaround is to use the MAC address filter such as ebtables, and set the virtual switch forwards EAPOL packet to the upper port only
Here is an example of the configuration for ebtables. 0x888E is the protocol tye of EAPOL and eth1 means the NIC of host server.
$ ebtables -A FORWARD -p 0x888E -i eth1 -j ACCEPT
$ ebtables -A FORWARD -p 0x888E -o eth1 -j ACCEPT
$ ebtables -A FORWARD -p 0x888E -j DROP
For your information, past Linux kernel does not forward any switch control packet including EAPOL at all. (It does mean the guest OS could not use 802.1X authentication.)
But one KVM user requested that he would like to use 802.1X from guest OS.
Then David Miller modified kernel to forward all switch control packets, in 21 Mar. 2010.
So then, the modern kernel needs this workaround to use 802.1X from guest OS.
For technical questions, don't hesitate to email to yasuda [ at ] ylb.jp.
Uninstall by NO EXTENSION command of CLI. Keep the order of uninstallation for their dependencies.
localhost#no extension dhcp-4.1.1-18.P1.EOS451.i686.rpm
localhost#no extension hostapd-0.7.3-EOS451.i686.rpm
localhost#no extension freeradius.EOS451.swix
localhost#
perl would not be able to uninstall normal method for their dependencies.
localhost#no extension perl.EOS451.swix
% Error uninstalling extension: RPM uninstall error: Transaction check failed: perl(Data::Dumper) is needed by
 (installed) net-snmp-utils-1:5.5-7.99.Ar.i686
perl(Fcntl) is needed by (installed) i2c-tools-3.0.2-4.fc12.i686
perl(File::Copy) is needed by (installed) net-snmp-utils-1:5.5-7.99.Ar.i686
perl(Getopt::Std) is needed by (installed) net-snmp-utils-1:5.5-7.99.Ar.i686
perl(IO::File) is needed by (installed) net-snmp-utils-1:5.5-7.99.Ar.i686
perl(POSIX) is needed by (installed) i2c-tools-3.0.2-4.fc12.i686
perl(POSIX) is needed by (installed) i2c-tools-3.0.2-4.fc12.i686
perl(Term::ReadLine) is needed by (installed) net-snmp-utils-1:5.5-7.99.Ar.i686
perl(constant) is needed by (installed) i2c-tools-3.0.2-4.fc12.i686
perl(strict) is needed by (installed) i2c-tools-3.0.2-4.fc12.i686
perl(vars) is needed by (installed) i2c-tools-3.0.2-4.fc12.i686
perl >= 0:5.004 is needed by (installed) i2c-tools-3.0.2-4.fc12.i686
/usr/bin/perl is needed by (installed) i2c-tools-3.0.2-4.fc12.i686
/usr/bin/perl is needed by (installed) net-snmp-utils-1:5.5-7.99.Ar.i686

localhost#
You can check the status of the registration of Extensions as SHOW EXTENSIONS command. See the Status is "A, NI". (perl remains as "I".)
localhost#show extensions
Name                                       Version/Release           Status RPMs
------------------------------------------ ------------------------- ------ ----
dhcp-4.1.1-18.P1.EOS451.i686.rpm           4.1.1/18.P1.EOS451        A, NI  1
freeradius.EOS451.swix                     2.1.9/EOS451              A, NI  2
hostapd-0.7.3-EOS451.i686.rpm              0.7.3/EOS451              A, NI  1
perl.EOS451.swix                           5.10.0/82.fc12            A, I   6
A: available | NA: not available | I: installed | NI: not installed | F: forced
localhost#
Delete Extensions by DELETE command of CLI.
localhost#delete extension:hostapd-0.7.3-EOS451.i686.rpm
localhost#
Repeat this process for the rest of Extensions.
SHOW EXTENSIONS command shows as follows when you finish it.
localhost#show extensions
No extensions are available
localhost#
Next boot time, these extensions will not be loaded automatically. For more detail information, see Extensions of Arista Square.
Above RPM files had been built for EOS 4.5.1. For more recent EOS, you can build to update the software by yourself. We built our packages on the PC which installed Fedora 12. Because Fedora 12 is the base Linux distribution of EOS 4.5.1.
Here are the source files as SRPM format;
Perl does not have any customization for EOS, so you can use generic packages.
Install SRPM files as follows. Note that, these process had been proceed on the PC. Not on the Arista EOS.
$ rpm -ivh dhcp-4.1.1-18.P1.EOS451.src.rpm
   1:dhcp                   ########################################### [100%]
$ rpm -ivh freeradius-2.1.9-EOS451.src.rpm
   1:freeradius             ########################################### [100%]
$ rpm -ivh hostapd-0.7.3-EOS451.src.rpm
   1:hostapd                ########################################### [100%]
$
Sources and patch files will be installed under rpm/SOURCES/ directory and specs files are also installed under rpm/SPECS/ directory.
$ ls rpm/
SOURCES  SPECS
$
Rebuild these files by rpmbuild command.
$ rpmbuild -bb rpm/SPECS/dhcp.spec
:
Wrote : /home/kenta/rpm/RPMS/i686/dhcp-4.1.1-18.P1.EOS451.i686.rpm
:
$

$ rpmbuild -bb rpm/SPECS/freeradius.spec
:
Wrote : /home/kenta/rpm/RPMS/i686/freeradius-2.1.9-EOS451.i686.rpm
:
$

$ rpmbuild -bb rpm/SPECS/hostapd-0.7.3.spec
:
Wrote : /home/kenta/rpm/RPMS/i686/hostapd-0.7.3-EOS451.i686.rpm
:
$
You can see created RPM files under rpm/RPMS/i686/ directory.
$ ls rpm/RPMS/i686/
dhclient-4.1.1-18.P1.EOS451.i686.rpm        freeradius-mysql-2.1.9-EOS451.i686.rpm
dhcp-4.1.1-18.P1.EOS451.i686.rpm            freeradius-perl-2.1.9-EOS451.i686.rpm
dhcp-debuginfo-4.1.1-18.P1.EOS451.i686.rpm  freeradius-postgresql-2.1.9-EOS451.i686.rpm
dhcp-devel-4.1.1-18.P1.EOS451.i686.rpm      freeradius-python-2.1.9-EOS451.i686.rpm
freeradius-2.1.9-EOS451.i686.rpm            freeradius-unixODBC-2.1.9-EOS451.i686.rpm
freeradius-debuginfo-2.1.9-EOS451.i686.rpm  freeradius-utils-2.1.9-EOS451.i686.rpm
freeradius-krb5-2.1.9-EOS451.i686.rpm       hostapd-0.7.3-EOS451.i686.rpm
freeradius-ldap-2.1.9-EOS451.i686.rpm       hostapd-debuginfo-0.7.3-EOS451.i686.rpm
$
FreeRADIUS is depends on perl and libtool-ltdl-2.2.6-15.fc12.i686.rpm. To install FreeRADIUS as Arista Extension easily, we archived them all to single SWIX format file. And we also archived perl and required modules for this 802.1X suite files into one SWIX file too. Note again, these process had been proceed on the Arista EOS. Not on the PC.
locahost#swix create freeradius.eos4.5.1.swix \
> freeradius-2.1.9-EOS451.i686.rpm \
> libtool-ltdl-2.2.6-15.fc12.i686.rpm
   adding: manifest.txt (stored 0%)
   adding: freeradius-2.1.9-EOS451.i686.rpm (stored 0%)
   adding: libtool-ltdl-2.2.6-15.fc12.i686.rpm (stored 0%)
locahost#

locahost#swix create perl.eos4.5.1.swix \
> perl-5.10.0-82.fc12.i686.rpm \
> perl-Module-Pluggable-3.90-82.fc12.i686.rpm \
> perl-Pod-Escapes-1.04-82.fc12.i686.rpm \
> perl-Pod-Simple-3.07-82.fc12.i686.rpm \
> perl-libs-5.10.0-82.fc12.i686.rpm \
> perl-version-0.82-1.fc12.i686.rpm
   adding: manifest.txt (stored 0%)
   adding: perl-5.10.0-82.fc12.i686.rpm (stored 0%)
   adding: perl-Module-Pluggable-3.90-82.fc12.i686.rpm (stored 0%)
   adding: perl-Pod-Escapes-1.04-82.fc12.i686.rpm (stored 0%)
   adding: perl-Pod-Simple-3.07-82.fc12.i686.rpm (stored 0%)
   adding: perl-libs-5.10.0-82.fc12.i686.rpm (stored 0%)
   adding: perl-version-0.82-1.fc12.i686.rpm (stored 0%)
locahost#
Now you have all RPM and SWIX files that will be required to install 802.1X suite to Arista EOS as described in 2.1 Package Installation.